DIY
speakers
amplifiers design loudspeaker design amplifier DIY DIY DIY super high
quality real Hi-Fi studio quality home studio recording engineer enjoy
feast revel
audiophile extra natural sound detailed open unmasked perfect sound
music lover lovers studio monitors home cinema entertainments
SQ-50 L Studio monitors /
audiophile speakers Relax and enjoy your music the way it was ment to be! That
is what true Hi-Fi is all about.
If you really want to
enjoy your music to the full, without paying a fortune for the
speakers, this is it!
Not
only thousands of music lovers, but also a number of recording studios
use the SQ-50´s because of their clean, natural sound with a wealth of
detail that makes the music really come alive. The whole audio spectrum
is clear, from deep dry bass upwards.
Tarsier Studios in Malmoe Sweden, a recording studio i Kenya (two pairs),
and dozens of others use the SQ-50´s for their excellent sound quality. They meet very high demands.
They
could
easily sell for 2000 USD ready-built in a specialized Hi-Fi shop. Maybe
even
more, depending on what "brand" was glued to the front. But you build
them for a fraction of that price. And, of course
you decide yourself what surface you want, according to your
preferences or to match your room.
The speaker kits have been sold in Sweden for over a decade with
thousands of satisfied customers already, but recently some development
has made them even better:
Autumn 2016: New filter, Audio capacitors and input conjugate link for
even better performance.
Spring
2017: Re-calculated bass port. The bass was deep before, now even
deeper. Without loosing any sound quality. An open, undamped
sound with a welth of detail, also in the bass register.
Cabinet size, outside dimensions: H 80 cm, D 39 cm, W 23 cm.
The text and
drawings below just show what our building instructions look like and
are not intended for practical use, the measures are wrong.
You get the correct instructions for the model you want to build along with the HSQ-50e loudspeaker kit.
This is the lower (80 cm) variant of SQ-50, called SQ-50L
You start off with a 2500 x 1200 mm 16 mm piece of fibreboard, the simple type
with a hard surface and more porous inside that dampens resonances
well. One board is enough for two boxes.
Do the cutting in this order:
1. Set the saw to 800 mm and cut two lengths 800 x 1200 mm.
2. Set the saw to 394 mm, take the pieces from (1) and cut four 394 x 800 (= sidewalls).
3. Set the saw to 190 mm and cut six lengths 190 x 1200 mm. 4. Take two of the 190 x 1200 -pieces and cut four 190 x 394 (= lids and bottom parts) Keep the leftovers.
5. Set the saw to 110 mm, cut two 190 x 110 mm left over from (4). (Inner parts)
6. Set the saw to 750 mm, shorten two of the 190 x 1200 pieces to 200 x 750 mm. (Fronts)
7. Set the saw to 700 mm, shorten two of the 190 x 1200 pieces to 200 x 700 mm. (Back parts)
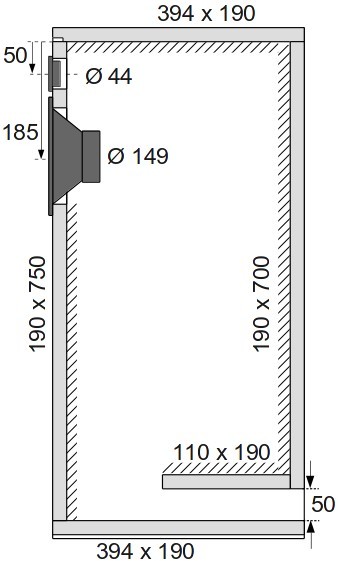
Now cut out the holes for the speaker drivers on the fronts (190 x 760 mm) See the drawing. The tweeter cutout is 46 mm in diameter, placed 50 mm from the upper edge of the front.
The woofer cutout is 149 mm in diameter, center of the hole 185 mm from the upper edge of the front.
Also drill holes for the speaker contacts on the back of the box,
preferably right behind the woofer, so you can easily reach it through
the woofer hole if something happens like a soldering getting loose.
Two 5 mm holes, separated 20 mm. Split a suitable length of cable,
solder onto the contact, then fit the contact with two screws from the
outside.
The parallell 45° lines indicate where the damping material is applied:
Front, upper part, back and inner piece. The grey area is the damping
material on both sidewalls. A reliatively light dampening material is
enough. If you happen to have an IKEA warehouse nearby, the very cheap
"Silvertopp" or "Myskgräs" polyester comforter does the job very well! Otherwise: 100 - 120 g / sqm polyester wool.
Keep the thin fabric on, and use tacks (far apart) to just about hold
the damping material in place. it should be compressed as little as
possible.
Before glueing, make holes for the speaker drivers:
Tweeter: Hole center 50 mm from the top of the front piece, diameter 44 mm.
Woofer: Hole center 200 mm from the top of the front piece, diameter 149 mm.
Glueing:
We prefer contact glue / adhesive. Put it on both surfaces, wait for 10
minutes and press together. Easy and quick, and no clamps, nails or
screws are needed.
Start by putting one sidewall (800 x 390 mm) on a flat surface.
Then glue in this order:
1) Lid (190 x 394 mm). 2) Front (190 x 750 mm), 3) Back (190 x 700 mm),
4) Bottom part (190 x 394 mm), make sure it gets parallell to the lower
edge of the sidewall. That is, horizontal when the box is standing up.
5) Inner part (190 x 110 mm).
There should be a distance of 25 mm (+/- 2 mm is OK)
between the bottom part and the inner part. This is the bass port, surface 50 x 190 mm, length 126 mm.
Before glueing the other sidewall, fit the damping material inside the box.
Cover
the front, from about 90 mm from its lower end up to the woofer.
The
front really needs no damping from there upwards.
Cover the inside of the lid.
Cover the back down to about a cm or so above the upside of the inner part.
Cover the upside of the inner part. Important: No part of the bass ports inside must be damped, it must "breathe freely".
Cover the sidwall you started with, but only down to about 90 mm from the bottom, se gray area in the drawing.
Damping of the remaining sidewall: Leave about 30 mm along the front,
back and top edges, and 115 mm from the bottom, so that no damping
material gets stuck in the glue when this sidewall is glued to the rest
of the box.
When you have finished tacking the damping material onto the sidewall, glue the sidewall onto the rest of the box.
Now the box is ready!
The box stands on its sidewalls, and they don´t vibrate vertically, so
no vibrations are passed down into the floor.
But you should still have
some sort of feet (or felt or similar) to protect the floor on which
you put the speakers.
If you use contact glue, the speaker drivers, filter and contacts can
be fit immediately, you don´t have to wait for the glue to cure.
Important. Speaker cabinets with bass ports only fit drivers with the right Thiele-Small parameters. The SQ-50 designs use the HSQ-50e speaker kit.
Exactly the right drivers and filter design. And, as stated before: Do
not use the design example above, most measures are wrong.
The correct
cutting template and drawing is included in the HSQ-50Fe kit.