| DIY speakers amplifiers design loudspeaker design amplifier DIY DIY DIY super high quality real Hi-Fi studio quality home studio recording engineer enjoy feast revel audiophile extra natural sound detailed open unmasked perfect sound music lover lovers studio monitors home cinema entertainments | ||
|
CM-50C, our "orto-acoustical" (or simply omni-directional) loudspeakers The DIY speaker kit, click here.  A Swedish graduate engineer, Stig Carlsson, who
was teaching acoustics at the royal technical highschool (KTH) in
Stockholm, was the inventor of the "orto-acoustical" loudspeakers on
which the CM-50C are based.
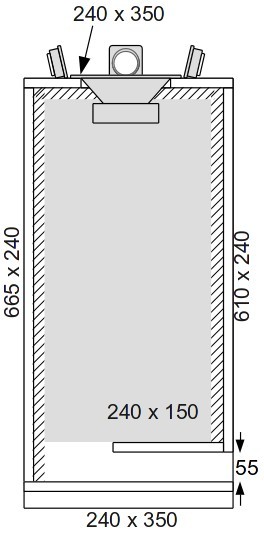
They were the first loudspeakers specifically designed to work in a normal living room environment. There is a difference between sound coming from normal loudspeakers with front-facing speaker drivers and sound coming from live instruments played in the same room. Stig Carlsson thought about it and came up with a brilliant idea, witch he called the "orto-acoustical" speaker. The reason why live instruments played in a living-room also sound live (instead of recorded) is partly because they "play along" with the room. A drum set, a piano, contrabass, a violin, a fluit... most acoustical instruments emit sound in all directions. So, there are sound reflexes that bounce off the walls, both beside and behind the instruments. Let´s say a group is playing in your living-room. A piano, a contrabass and drums. The sound coming directly from the instruments makes your brain hear the music. But the sound reflected by the walls will add the "room information" that makes you hear that they are playing in your room, not in "open space". Simplified: Direct sound = what is played. Reflected sound = where it is played. So, if you want the music you play sound like if the musicians were actually playing in your living-room, the sound from your speakers should eminate in all directions, so you get the same reflected sounds as from live instruments. But with "ordinary" loudspeakers this is not the case. Thery have front-facing speaker drivers. So, at least at higher frequencies there are no reflections from the wall behind the speaker and very little from the sides. You get the direct sound, and that´s about it. Close your eyes and you hear that the musicians are not in your room. If you want the feeling of musicians playing inside your own room, the CM-50C´s will do that for you. If the recording is good, and the music to your taste, you will love it. But this is not the only positive feature resulting from the omni-directional sound: Let´s say a few musicians are playing their instruments in your room. What happens if you walk around in the room, or sit down in different places? Nothing. They don't suddenly sound different because you have changed listening position. There is no special "sweet spot" in live music. When your brain can detect reflections from all the walls of the room, it can compensate for your position. You may sit or stand wherever you please without any problem. The same goes the other way around: If you invite a few musicians to play for you in your living-room, do they have to be in specific places? Must the drummer be 80 cm from the wall, for example? Not at all. They may spread around the room as they like, it would still sound live and natural, because you get the sound reflected from the walls and your brain is able to compensate. The SQ-50C works the same way, and this is what gives them such a high WAF: You can place the speakers wherever they fit in with your other furniture, instead of furnishing the room to fit the placement of the speakers needed for best performance. Tell your partner about this and you will be building your SQ-50C´s next week. ;-) To glue four tweeters vertically in a ring around a woofer on top of a speaker box is not a job suitable for robots. It would take several minutes more and involve human beings, which these days is a no-no for most manufacturers. So, as far as we know, you will not find this kind of speaker even in exclusive Hi-Fi shops. However, it is a very rewarding DIY project. It only takes a few hours to assemble the box and fit the speaker kit components, click here for more info about the kit. Then you have a wonderfully natural sound for many years to come. About the components in our kit: We use very high quality minrange/woofers and tweeters only. The filter constists of the best audio capacitors, ceramic resistors and airwound (iron free) coils. You get the same superb audio quality as with the rest of the SQ-50 loudspeaker designs plus the orto-acoustical 360 degree sound field. We do not recommend using the instructions below for practical use, even if you can print them yourself. We take no responsibility for the result you get using these drawings and instructions. So, wait for the printed instructions supplied with the speaker kit before starting your project. Cutting instructions for SQ-50C ”orto-acoustical" loudspeaker (one pair). Follow these instructions, and you get high precision, as you only set each measure once. 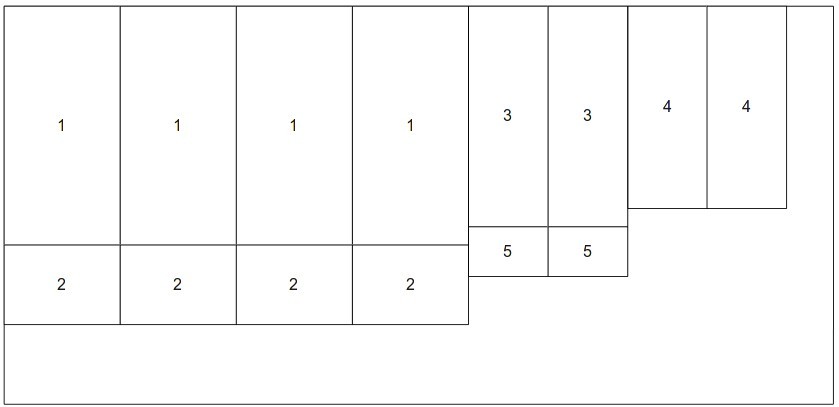 Use 16 mm (5/8 ") particle board, the kind that is hard on the surface, porous inside. It gives good damping againse resonances. The sheet above is 1200 x 2500 mm, which is enougf for two SQ-50C boxes. 1. Set the saw to 350 mm and cut four lengths 350 x 1200 mm. (1 and 2 in the picture) 2. Set the saw to 720 mm and shorten the pieces from (1) to four 350 x 720 mm (4 x "1" in the picture) 3. Set the saw to 240 mm, take the left over pieces from (2) and cut four 350 x 240 mm. ("2" in the picture) 4. Also cut four lengths 240 x 1200 mm (3, 4 and 5 in the picture) 5. Set the saw to 665 mm and shorten two of those lengths to 240 x 665 mm (3). save the leftovers to (7) below. 6. Set the saw to 610 mm and shorten the last two 1200 mm lengths to 240 x 610 mm ("4" in the picture) 7. Set the saw to 150 mm, take the leftovers from (5) and cut two pieces 240 x 150 mm. Make the holes for the woofers, diameter 149 mm, in the middle of two of the 350 x 240 mm pieces. If you don´t have a saw, you can use a normal drill, see this instruction.) Then follow the drawing and instructions below. If you want to protect the speaker drivers you can use a lattice or a frame covered with fabric on top of the speaker. The frame should not be unnecessary high, 55 mm is enough for the tweeters to fit under it. To avoid even small resonances the inside of the frame should be covered with damping material.
Also make holes for the speaker terminals. Two 4 mm holes, 20 mm apart. Preferably where they are easy to reach from inside, about 10 cm from the top on the back , so you can reach them through the woofer hole after the box is complete, if necessary. Now is also a good time to mount the filter and connect all wires to it. You can hang it on a screw or nail just below the speaker terminals. Connect the tweeter wires according to the drawing supplied with the filter / filter components and pull them through the holes for the tweeters* and the woofer, long enough so you can solder them onto the speaker drivers outside the box later. * The tweeters are placed in a ring turned inwards, equally spaced (90°) about 1 cm from the edge of the woofer. See left picture below. Behind each tweeter, about 3 - 4 cm from the edge of the woofer you drill two small holes for the wires to the tweeters. See right picture. The diameter of the holes should not be more than 1-2 mm wider than the wires themselves. 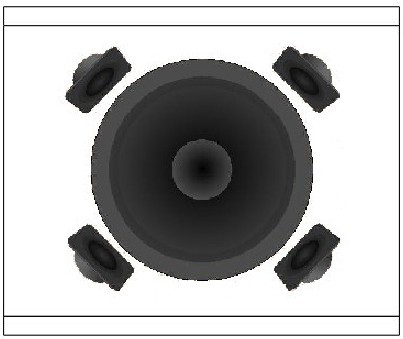
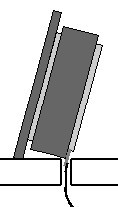 Place the tweeters turned slightly upwards. (Simple: Just let them rest on the front and magnet.) You can use melting glue to fix them, it is quick and easy. Just a string on the bottom edge of the tweeter and quickly press down in the right position. Then a drop fixing the back of the magnet to the top of the box. Or, if you use "slower" glue, you can temporarily use long nails through the lower screw holes of the tweeters to keep them in place while the glue cures. Remember to paint the top of the box before fitting the speaker drivers, it will be difficult with the tweeters in place. If you decide to make a frame covered with fabric (see below) we recommend painting the upper surface of the box black. That way you will not easily see the speaker drives even if the fabric is rather transparent. Wire areas: We recommend very thin wires to the tweeters. With normal music, full power, they will still only be fed less than one watt. So 0.2 sqmm (24 AWG) wires are more than enough. For the woofer,and between filter and speaker terminals, we recommend 0.75 sqmm (18-19 AWG). Thicker wires makes it easy to overheat the terminals and components when soldering. So don´t exceed these recommendations. And only solder for maximum 2 - 3 seconds. If not enough, let it cool down and start over. Overheating can cause permanent damage to terminals and components. To protect the speakers we recommend making a frame on top of the box, put a layer of damping material on the inside of the frame, and then cover it with cloth or metal mesh: 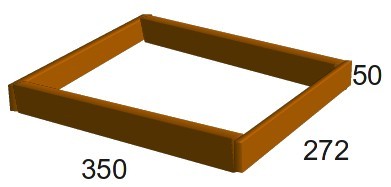 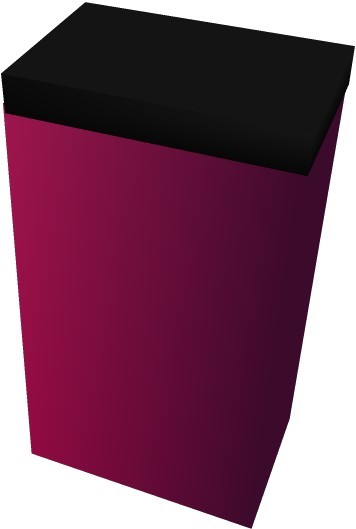 Suitable type of metal mash: 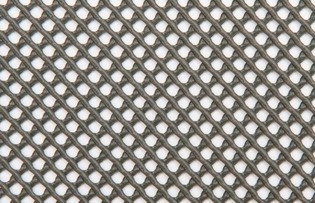 HSQ-50Ce complete kit for one pair of SQ-50C loudspeakers, CLICK HERE. The HSQ-50Ce kit includes two woofers, eight tweeters, high quality audio filter components, 10 m loudspeaker cable, also suited for internal wiring of the woofer + filter, thin wire for the tweeters, self resetting electronic fuses, filter drawing and correct building instructions, drawing and saw template for the speaker boxes printed on paper. We do not recommend using the instructions on our site for practical use, even if you can print them yourself. We take no responsibility for the result you get using these drawings and instructions. So, wait for the printed instructions supplied with the HSQ-50Ce kit before starting your project. |
||